limited production :: hand crafted :: high performance :: rechargeable :: premium flashlights

This is my blog about creating a startup LED flashlight business. I'm a designer, fabricator, and strategist and I'm passionate about making ideas real. I believe that products are about people, that they should be built to last, deliver real value, and that we need to do a better job than we have in the recent past.

Most of my career has been contract or freelance work and I've crafted products and strategies for both big international companies and startups. I also used to work in the "industry" fabricating special effects for film and TV, along with the occasional hot rod. Bottom line, I love making things.

I'm starting this blog so you can follow along, from day one, and see what it's like to start a business, or fail in the process. Only time will tell, but I hope you find this interesting enough to stay tuned, comment, link, like, tweet, and (most importantly) participate in turning this idea into something tangible and valuable.

For a good place to get started with general info about who, what, why, etc., check out the "Stickies" on the left side of the page. Thanks for stopping by and please don't hesitate to ask questions and get involved!

Please sign up for my email list to get updates and notifications for contests and giveaways!

Showing posts with label BTS. Show all posts

Monday, July 15, 2013

Old Toasters & New Tools

I just had some custom made LED mounting bases manufactured, which are very awesome. However, it was going to cost and outrageous amount of money to have LED soldered to them by a third party vendor. Soooo, I decided to make my own Reflow Toaster Oven! Don't worry, that's not as terrible of an idea as it sounds. I purchased a Black & Decker FC150 Infrawave oven like the one below.
Black & Decker FC150 Infrawave toaster oven
Basically any toaster oven with infrared heating elements will work. The FC150 is very old and hard to find, but is one of the original "host" ovens used when this kind of mod became popular...oh...a bunch of years ago. The main reason I wanted this model, is I knew there was space inside the side panels for all of my kit. The upgrade involves some fancy electronics that you'd need a degree to identify and assemble, but in the internet age...ETS Techincal already makes a kit! Let's open this bad boy up shall we? 
Yes, it's as much of a mess as it appears to be. (Click for a larger image) 
I didn't really take any "process" shots but this is about 3/4 of the way through the conversion. It's reasonably simple if you have some basic knowledge of AC wiring, DC wiring, and relay wiring. No biggie right? :) The main part of the kit is a microcontroller with an integrated LCD display and external keypad. You basically disconnect ALL of the existing wiring/controls and install the new kit in the side panel of the toaster. I also installed a sheet of adhesive backed thermal shielding to help isolate the electronics from the heat inside the oven. Blah blah right? Where is the video?!

Best Viewed in Full Screen (1080P HD)!

Saturday, July 13, 2013

Kickstarter Progress Update: Alpha Pen

Hey folks,

I figured some of you would be interested in the Kickstarter progress/process even if you didn't back the project. All of my updates are public...except for boring administrative stuff that only applies to backers :) So you can just follow this link and find the current update and all of the past updates as well!


Please don't forget to check out my YouTube channel as well! Here is my last fancy pants update video created by Whitmore Productions. I have other short behind the scenes videos about the pen project and other flashlight esoterica too :)


Monday, December 24, 2012

A monkey in your mailbox...

That's a catchy title right? Don't worry, we are talking digital monkeys.

Merry Christmas!

I've signed up with MailChimp to help streamline my workflow. That's a fancy way of saying, my blog will now send you an email if there is a new post and you've signed up for the mailing list. In the past, I've sent out "announcement" type emails separately. If you wanted blog content, then you had to (separately) visit the blog and/or sign up specifically for email updates.

Monkeys love email! Or so I hear. 
I hope this is a positive improvement, and I've merged those lists and now all updates will take the form of blog posts, which will get pushed to your email inbox automatically. Basically this saves me from managing multiple lists and trying to remember where I'm supposed to publish what information. It will also mean those of you on the mailing list will actually get emails from time to time :)

How will we know if it's working? This post (yes this very one) should trigger MailChimp to send you this post in an email at 6:00AM Pacific time tomorrow. You will not get an email if I have not posted any new content during the day. Of course if you have not already signed up on the mailing list you won't be getting any Christmas email from Prometheus Lights! If you feel left out, you can go here and get on the spankin' new mailing list :)

Sunday, December 2, 2012

VIDEO: Shop-Made Pneumatic Press

Hi folks, just a quick YouTube video of a pneumatic press I made to provide the correct pressure when setting the thermal adhesive tape I use to mount the LEDs in my lights.

Saturday, December 1, 2012

Thursday, November 29, 2012

Getting There!

Doing some finish machining on bodies today. In the photo, I've just finished grooving a stone washed shorty body. I have to do about 80 bodies total in this run. Wish me luck!

Saturday, November 17, 2012

When in doubt, MacGyver it

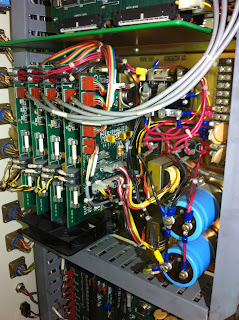
So yes, I did look up the spelling of MacGyver and it's corret. Weird right? Anyway, I don't mean to give myself too much credit with that title but I couldn't come up with anything else. Recently I had to install a phillips screw inside the control panel of my CNC machine. The trick was it was between two circuit boards that are mounted on end. Think of sliced bread with a 1/2" gap in between and about 6 inches deep and who knows what kind of sensitive electrical components on each side. Remember that game "Operation?" Zap!

Yeeep, right in between those drive cards.
Oh and don't touch the capacitors. 
What to do? I rolled some painter's tape into a tube so it would be sticky on both sides and jammed it all together. Enough grip to keep the screw on the driver but can be removed easily enough. Pretty good eh? It worked beautifully.
It ain't purdy but it worked


Friday, November 16, 2012

How it's made

I had a few people ask about seeing more of the process, so I thought I'd post some random photos from time to time. I also had someone ask what the "chips" were that I referred to in my last post. Chips are what machinist's call the little bits that get shaved off by the actual machining. While sawing isn't really machining (or is it?) the shot below is the best "chip shot" that I had on hand. This is after cutting off a batch of raw stock to length. That's a lot of chips in case you were wondering.

The deck of my chop saw..the lip on the pan is about 2" deep. 
 After all of the parts get cut to length they get piled into boxes and it's on to the next step. The saw cut edges are quite sharp and have "burrs" on them. I need to debur one end before it goes into the CNC mill so the parts sit nice and square. Otherwise, the burrs would make them tip one way or the other.

Cutting the stock to length is not my favorite job. Earplugs and annoyed neighbors required

Wednesday, October 10, 2012

NEW VIDEO: Tools of the Trade - "Spaghetti" Tubing Cutter

Hey folks, I bought this broken tool on eBay and managed to get it working again! Thought I'd share some of the "behind the scenes" stuff that I do to make the Alpha (and running a flashlight business) possible.


Sunday, July 29, 2012

Prometheus "Writes": Montblanc style

Okay, so I haven't been posting much because I've been busy coming up with more awesome. I've been wanting to do this project for years but just never got around to it. I've you've never used a Montblanc, it's writing nirvana. I mean the cartridge, not the pens themselves. Considering a Montblanc starts at about $350 and goes to well over a grand, most people have never used one. I bought a good friend a Montblanc when they graduated from law school and I took it for a test drive before handing it over. I was astonished and I've used nearly every pen on earth.
The Mont-Alpha ? 
The prototype in the photo is armed with the Montblanc "FineLiner" which refers not to a cosmetic product, but to a fiber-tip ink cartridge. It's kind of like a felt tip, but it's firm and doesn't wear down and get fat like felt pens. However, you can control the line weight like with a fountain pen, and it writes just as smooth and dries immediately. For you traditionalists they also make a liquid-ink ball point cartridge that is interchangeable. The FineLiner comes in blue and black, while the RollerBall comes in a host of colors.


A brass button head screw
This prototype is raw, un-plated aluminum with a "machined" finish. This is how it looks right off the lathe, no sanding or polishing or anything like that. I plan to offer a nickel plated (to match my lights) and (drum roll) a titanium version as well!


The cap screws on and uses the titanium clip that I make for the Peak Eiger flashlight, with a slightly shorter bend at the shoulder. Blue fluorosilicone o-rings provide a nice grip surface. Soft but positive. Since the photo was taken I've added a 5th ring closer to the tip of the pen. The "styling" is up in the air and just what ended up with after a frenzy of machining. The production version may (or may not) look similar. Whatever the case, it will be a full-size pen with a screw cap and accept either the Montblanc FineLiner or RollerBall refill. The refills cost about $7-$8 each.

Any interest? :)

Saturday, July 28, 2012

Joby, meet Alpha. Alpha, meet Joby.

I've been fooling around with some "other' ideas about what you can do with a light. One drawback to flashlights is that you have to hold them in your hands. Joby even makes their own line of lights that mount to their tripods...but they are...wimpy. I wanted power, anywhere, anytime. So, I headed over to the CNC mill and made myself a set of three mounts. These are prototypes so I just hacked them out in an afternoon.

The cool thing about this particular tripod is the little red feet are magnetic, increasing the versatility even more. It's amazing for automotive work.


Time to start putting light where I need it
Most people think headlamps are the solution to hands free personal lighting, but I think for the most part, they suck. Don't get me wrong, I have 4 headlamps and they have their purpose...last resort lighting. My most frequent use is a tiny Black Diamond light that I wear around my neck when I'm in camp. Oh but you need to "work on something" and have your hands free right. Ever notice how having the light close to your line of sight is guaranteed to make your hands cast shadows on your work-space instead of actually lighting it?

Wednesday, June 20, 2012

Prototype Titanium Tailcap Button

Hey all, this is one of those accessories I've been planning to do from the beginning but never have the time to work on. It looks pretty simple but this is my 4th prototype. The button is designed to be a direct replacement in all Alpha's manufactured to date.

Stay classy my friend
Right now I'm still trying to find a return spring with the right force. The button has an o-ring around it which needs to fit tight enough to keep out water, but a spring is needed to push the button back into the "out" position. The tighter the seal the firmer the spring needs to be and the harder the button gets to push. It's been a little tricky to balance...BUT IT LOOKS AWESOME!

Tuesday, May 1, 2012

New Logo: at it again (please vote!)

Hi All,

Well I'm still trying to get the right logo. You know the drill. Which do you prefer?

The poll is open for a month but I'm hoping to make the decision by the end of the week so please vote now!


Which logo do you prefer?


Friday, April 20, 2012

WIN: I modded the world's best flashlight switch

I should say right up front this is going to get pretty geeky. Like comparing two different types of springs geeky. Better buckle up. I was at a manufacturing trade show (better latch that tray table as well) and found a company called Smalley Steel Ring Co. They make some really interesting stuff...enter the wave spring. It's time to loose the conical battery contact spring and get with the wave spring. I'll be integrating these into my lights as soon as possible.

No flashlight should use anything else. So, when everyone starts doing this, you heard it here first :) This is henceforth known as the "Prometheus Spring!" Cue the music...or you can just check out my first prototype integration after the jump.

They even look cool right? Besides that, there are even more advantages over a standard conical spring. Here are the highlights:
  1. No sharp edges. A typical conical spring is really sharp where the last coil is cut off and that cuts into the thin metal on each end of the battery. Long term...not good. It also makes the light feel awful and "scratchy" when opening and closing. Right now I have to put a blob of solder on the PCB spring and the McClicky switch spring to prevent them from destroying the batteries.  
  2. Distributed contact area: Each wave spring will contact the battery at the crest of each wave...typically 4 different places. A conical (or coil) spring only has one point of contact. Multiple contact points distribute the load generated when the light suffers shock...for example, when dropped. Every effort should be made to protect li-ion batteries from physical damage. 
  3. Shorter current path. In a typical spring the current must pass along the entire length of the spring, as if it were a straight wire. More distance equals more resistance, and resistance is bad. As you can see in the photo above, each crest touches a trough, making the current path incredibly short.
If you made it this far you might as well read on after the jump. More photos! You like photos right?

Sunday, April 15, 2012

Help me with an instruction sheet!

Hi folks, so one thing I've been messing around with is an instruction sheet. One of those dozen little things that takes some cents out of my pocket but I think it will be both helpful and a nice touch. I'm having it printed, double sided, on post card stock. Please take a look and let me know what you think. Clarity, content, typos, whatever. I'd like to get some printed up sooner than later so please take a sec and comment!


Friday, March 9, 2012

Laser cutting LED thermal pads (Epilog Helix)

I have been buying pre-cut thermal pads but this time I decided to make my own. This is the same material I normally use, purchased in a bulk sheet. Cut on an Epilog Legend 45 Watt laser cutter @ Techshop in Menlo Park. Nothing like cutting parts with a beam of light!

Wednesday, March 7, 2012

Show, tell, both? Your opinions!

Sorry for the lack of updates lately but I've been in an anti-blog phase. It's actually really hard (at least for me) to keep interested in the blog. I envy those "real" bloggers who can just pump out content on a regular basis. One thing that does keep me interested is if I know people are reading and enjoying...so please comment and/or share some posts with your friends, Facebook or otherwise :)

Enough babble, here's the meat. I've been meaning to add photos to my "packages" page to illustrate what you  get when the little flat rate box shows up at your house. It's obviously the same content as the bullet lists, but I think images are a little easier to wrap your brain around no?

Click here to navigate to the "packages" page on my site (new window)
One thing I was unsure about is whether I should integrate the images as a replacement for the bullet list, or keep it supplemental at the bottom of the page...the way it is now. Please let me know if you have any feedback!

Tuesday, March 6, 2012

New Look for "LED Options" Page

Hi all,

I've been trying to make your browsing experience more streamlined, and one major change is to my "LED Options" page. I've added more options and "tried" to make the presentation easier to understand.

You might not notice, but I've also moved "step 1" and "step 2" to the left side of the page. I got some feedback that people saw #1 and #3, but skipped over #2.

I'd love your feedback! What works, what doesn't, what could be improved?

Click here to navigate to the website page (new window).

Click the image below for a larger view (just an image, no navigation).

Monday, December 12, 2011

The Alpha "Shorty"

Hi all,

I've had some special requests for a more compact Alpha...and this is the only "finished" light that exists. It uses a smaller battery, but otherwise it's identical. These will not be offered for general sale because they require a special battery and charger that I don't (at this time) have for sale. This light will run on a RCR123 or 18350 sized battery but it must be an IMR chemistry cell to handle the massive current draw. Run time is...not very much. It's a real pocket rocket though.

Smaller size...same punch
These are special order items only, so please email if you are interested. It looks cute but it can be dangerous if used with the incorrect batteries...so I consider this an "advanced" flashlight. For example, if you don't know what RCR123, 18350, and IMR chemistry means...probably not for you.

This one-off light gets a fancy fluorosilicone o-ring
Fluorosilicone is about 10x the cost of a normal Nitrile o-ring and is the material specified by the US military for use on jet aircraft fuel lines...and stuff like that. Part of what makes them expensive is that they have an "indefinite" shelf life. Nitrile o-rings expire after 10 years. I told you these are made to last right? Do you think I should start using the blue o-rings on all of my lights? Comment below!

Monday, November 14, 2011

Fun with coatings, part 2: Titanium Nitride (TiN)

I've been working with Advanced Coating Technologies to create some special edition lights that are coated with a Physical Vapor Deposition (PVD) process. These coatings are used on extreme applications like carbide tools for milling and turning. The coatings are microns thick, but incredibly hard. Think of it this way, tungsten carbide is one of the hardest man-made metals in existence. They use PVD to protect this material. No joke right?

Ohhh yeah. 
This is my first sample that is coated in Titanium Nitride (TiN). Need a little more bling in your flashlight? I have no idea if this will be popular or not...but it's still pretty awesome. I'll be getting samples in Diamond Like Carbon (DLC) and Titanium Carbon Nitride (TiCN). These will turn out black and deep grey, respectively. Stay tuned, I hope to have samples in the next couple of weeks.

The light pictured above is one-of-a-kind and is now for sale on my website. Check it out here.